Bordering the Snood: How To Crochet a Neat Loop Border
Yesterday I promised to reveal how I border my loops (or, "snoods", as my cousin tells me they're also called). So today I'm going to focus on, what I call, "bordering the snood".
Now, you'll remember that I shared my snood pattern with you already. If you'd like to have another wee look, click the link and I'll see you in a moment. Otherwise, let's take a look at how I get that border looking so schmick. Let's take a closer look at what I'm talking about, and what we're going to do together:
 |
| Detail: The loop border we're going to work on today. |
You'll want to take a good look at the loop you've crocheted and select three (or more!) complementary colours for the border. In the above photo, I had winter in mind and selected a darker blue for the first row, a pale green for the second, and an icy white for the final row. I wanted the white specifically as I'd already planned to add a snowflake to this project, and wanted that snowflake colour reflected in the border, to connect the two visual elements.
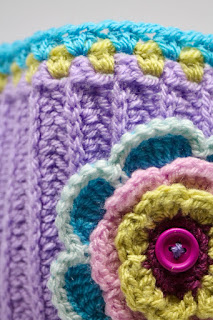
If you're going to be adding a flower to your loop project, you may want to think about the colours your flower will contain, and arrange these in your border, for example in this project I recently completed (available for purchase via Etsy, if you're keen!):
 |
| See how the lime and turquoise border colours are reflected in the flower (or vice versa)? |
We're going for a set number of colours here, not an explosion, so choose wisely!
Let's look again at that loop, specifically at the long sides. Remember how I advised to only ch1 and then turn, before commencing your HDC row? That was for a reason - your edges should be uniform, no gaping holes, just small, distinct holes. That's what we're going to be using. In the photos I'm using a loop which I've not yet sewn together, so it's easier to photograph:
See where my hook is? That's the space we're going to be using, all the way around. It's easy to spot, but if you get a little stuck just look for the hole immediately next to your raised "ridge" row.
I've popped my fingers into the shot here, so you can see what I mean:
Now you'll want to pop your hook into one of those holes, and pull your yarn through:
Chain two:
And now do 2 HDC. So now you have, in effect, 3 HDC. Fab!
Now go ahead and keep doing 3 HDC into each hole, until you've gone all the way around. Slip stitch into that first ch2, and tie off. Sew in your ends.
Now you can get started on the second border row. See where my hook's pointing? That's where we're going to start (theoretically you can start from any of these spaces, but it's best to start close to where you finished, to keep things neat and tidy).
Pull your yarn through, ch 2, then do 2 HDC. Again, we're working on the principle of you having 3HDC per gap.
Continue with 3 HDC until you've worked your way all around the loop, sl st into the ch2, tie off, and sew in your ends.
Easy-peasy, right? You can continue in this manner until you have the border you want: two, three, four colours, in whatever combination takes your fancy.
Now, because my tension is a little tight, I do 3 HDC into each of those spaces (plus, I don't want to be squeezing my head through the loop come winter time!). You may want to experiment and check whether 2HDC suits your tension better.
So, I hope that's helped and I wish you all the best with your loops! Be sure to let me know how they go!
Wishing you a fabulous day,
Jacqueline @ Made in Rentzschmühle
p.s. It would be lovely to see you in our Facebook group for more crafty goodness!


Comments
Post a Comment